Sooty Solutions - Burnaby BC Consulting Company - Advising Business Managers on Security, Information Technology, Business Process Performance, & Best Practices
Sooty HomeContractors are BetterThe Sooty ApproachLong Range PlanningThe Sooty PartnersContact Us

Moving an Old Windows 7 Disk to a New PC

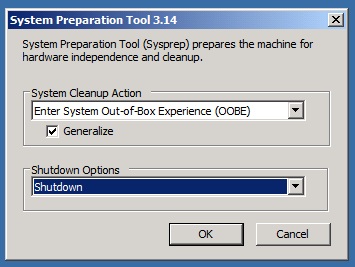
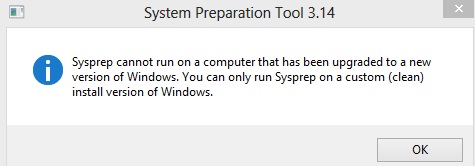
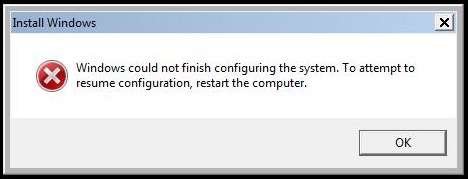
This is hacker project that should only be attempted by someone with such confidence in their technical abilities that it verges on arrogance. It is a tale of multiple catastrophic failures that eventual resulted in success. If you lose focus, if you forget the goal, if you momentary doubt your skill (Hudson: "That's it, man. Game over, man! Game over!") you will not get your old Windows 7 disk running again.

Background: Why it's so hard to move a Windows 7 disk

Microsoft has never had a tool that adapts to hardware changes like those used during a Linux startup (kudzu, HAL, udev).

In the Linux world the tiniest of OSs (microkernel) loads first. It looks around gathering information from the BIOS and bus probes to figure out what hardware it's running on. Then over several phases loads device drivers and assembles operational control of the hardware platform. This makes it extremely robust to hardware changes.

Windows has a frozen configuration of the hardware it last saw. It makes the assumption that this is the hardware you are asking it to start up. Once it is up and operational it runs probes to see if anything has changed. If it finds something new it tries to load a driver for it. If that succeeds it bolts the new driver into its frozen configuration.

This has two problems. The annoying part which is that Windows gradually accumulates driver deadwood of bits of hardware it has seen. It is extremely difficult to get rid of these ghosts of hardware past (although there are 3rd party tools that do it).

The lethal problem is that if you remove a bit of hardware Windows will either wait for it to reappear (hang) or try to init the device, get a kernel exception, and crash. There is no way to tell Windows during startup that you have changed the hardware. It is so convinced that you would never change the hardware (Who Moved My Cheese?) it has a hissy fit and refuses to start up until you to put things back the way they should be.

All is not lost. When you get a new PC the installation DVD is very good at booting on hardware it has never seen. It then loads and configures a frozen view of the hardware that it never expects to change. If you could just get the Windows on your disk to forget that configuration and behave like the installation DVD it would adapt to the new hardware.


Making your Windows disk forget

The System Preparation Tool (sysprep) comes with Windows 7 and makes it forget its rigid view of the world. It returns your disk to nearly the state of an installation DVD...or rather the state your disk was in just after the DVD had loaded a fresh Windows image.

After sysprep your disk will now boot on the new hardware then progress through the "setup is configuring your system for first use" process. This is way better than hanging or crashing but there are a number of unpleasant side effects.

Don't do this yet...see unpleasant side effects below (including a stern warning to back your disk up) ...but this is how to run sysprep:

From "Start" search for cmd.exe then (right mouse click) run it as administrator.
C:\> %systemroot%\system32\sysprep\sysprep.exe

Set the System Cleanup to "OOBE" and the Shutdown Options to "Shutdown" and (abandon all hope) click "OK"
...this Microsoft document explains the sysprep options.

sysprep run for several minutes:


Your disk will now boot on new hardware and you will see a series of setup screens (on black backgrounds):


When it finishes your old disk will now be running on the new hardware (success).


Unpleasant #1: sysprep refuses to run


sysprep will not run on any disk it "thinks" is an upgrade. There are probably very good reasons for this (it leads to unpleasant things) but we are undeterred. There is a single key in the registry that prevents sysprep from running. This may have been set by big things (you upgraded from Vista) or trivial things. Making the leap of faith that the "upgrade" state will not cause us grief all we need to do is delete the key.

From regedit.exe find the path: HKEY_LOCAL_MACHINE\system\setup
...and delete: "Upgrade"
...now sysprep will run

Unpleasant #2: Starting services crashes


After "Setup is updating registry settings" finished the next step is to start services. It will enter this step but after a short time you get the "we're screwed" message. Actually goods things are happening but they encounter a bridge too far and fail. If you keep restarting the computer you will notice that the failure does not happen at exactly the same time...some times it's slow sometimes fast.

Don't give up. It took my disk eight (8) attempts before it made it past this point. It was probably because it was a Vista to Window 7 upgrade and not a good candidate for this process.

Unpleasant #3: No key

If (when) you get past setup you will be challenged for your Windows Key. If you lost the little tag that had the key you have a problem. The key is in the registry but it is encrypted and is not human readable. You will need a 3rd party tool to recover your key in its xxxxx-xxxxx-xxxxx-xxxxx-xxxxx form. You may be able to convince Microsoft you have a genuine license...or buy a new license (ouch).

I used a free tool called Belarc Advisor ...I am really paranoid about installing 3rd party "free" tools on the computer I use for online banking. I ran AVG on Belarc before and after I installed it and so far (weeks later) it appears safe. The nice thing was it also gave me a report that included my Office and Visio keys and a several others.

Unpleasant #4: New "administrator" user created - the old one is deleted

This is why you do a backup. The setup process forces you to create a new user (I used Test) and does not tamper with any other user account. It really does a number on administrator. When you first bring your system up the login process creates a C:\Users\TEMP path and that's the new administrator path. When you log out of administrator it deletes the temp path.

I have enabled my administrator account so I can login in to it (C:> net user administrator /active:yes). The security advice from Microsoft (and lots of other folks ... I'm a CISSP so I know a lot of them) is you never log into the administrator account. On a Linux systems I never log into root. I sudo everything I need to do at elevated privilege. The chain of trust from a sudo to automated applications works simply and "as expected" on Linux.

Unlike Linux the security management model on Windows is extremely complex and very fragile.

I completely agree that if commands that do something (run a program) arise from a mixed chain of trust they must be reduced to the lowest privilege in that chain. If the administrator user commands something and Joe amends it then it should be Joe's privilege that is used. This is a fundamental tenant of good security. Windows enforces this (so does Linux).

Unfortunately Windows appears to pick up the credentials of low privileged accounts at unpredictable places in an automated system. Something that has worked for years will suddenly stop working. It is possible to debug the chain of trust and figure out why Windows decided to include the low privilege account in the chain (so you can fix it). The problem is that Microsoft provides no good tools to debug the chain (a good tool would be a hackers tool and a security problem). The result is "fixing" a problem is enormously costly and most just "reinstall" the chain...kinda like reinstalling Windows instead of "sysprep"ing it.

Automating a chain that originates from the administrator user account almost always works and almost never breaks. It's bad security but good reliability (good "availability" and "integrity" in CISSP speak). So I have a lot of stuff that runs under administrator and I login in to administrator to maintain that...and the Windows startup destroyed 2Gb of that carefully constructed stuff (arrrr).

Back to the problem of rebuilding the original administrator account. First do a system backup. From "Control Panel" put "Backup" in the search and link to the "Backup and Restore" panel. Select "Create a system image".

Unpleasant #4.1 - it wants to back up your entire disk so if your haven't cleaned up you disk in a while (or ever) you might have to make a trip down to Best Buy to pick up a terabyte USB drive.

Unpleasant #4.2 - the "target" of the backup cannot be the "source" of the backup. So if you've only used 100Gb of your 1000Gb system disk you off to Best Buy to get a USB drive.

Unpleasant #4.3 - it can take a long time to back up a full disk. My 300Gb backup took 8 hours.

...in the end the back worked and it contained my original C:\Users\administrator files. This was good because my encrypted backups on AWS Glacier relied on programs that would not compile and run under the fake administrator (I gotta fix that).

Unpleasant #4.4 - restoring from backup is not well documented. The restore option from the control panel does not seem to understand the structure created by the backup option (??).

The easiest way to restore is to mount the virtual disk created by backup.
From the control panel search for "disk" and select "Create and format hard disk partitions".
...that gets you to a "Disk Management" panel.
Under the "Action" tab select "Attach VHD" and browse deep into the \WindowsImageBackup\ path created by the backup.
...you need to find a large file (oddly named) with a VHD extension.

Once attach the file shows up as a mapped network disk (like E:) and you can copy files out as if it were a NTFS disk.

Unpleasant #4.5 - the C:\Users\administrator path is disabled in the registry.
From the "Test" account use regedit to make the administrator user a regular user.
In HKEY_LOCAL_MACHINE\SOFTWARE\Microsoft\WindowsNT\CurrentVersion\ProfileList you will find a number of paths.
...the short names (like S-1-5-18) are not full users.
...long names (like S-1-5-21-1234567890-123456789-1234567890-500) are real accounts.
...the old administrator account will look like S-1-5-21-1234567890-123456789-1234567890-500.bak
Fix the User\ path so it is back to C:\Users\Administrator
Remove the .bak from the path name.
...you now have restored the administrator path and made the user "non-temp"

Unpleasant #4.6 - the restored C:\Users\administrator files get deleted at login.
...you delete the bogus C:\Users\Administrator and restore the C:\Users\Administrator from your backup
...you log into the administrator account and you get the fake administrator desktop...what the f###?
...the files have been deleted again.

I did this 3 times before the login stopped deleting the files.
...once Windows accepted the restored files it never deleted them again.

Activating Licenses

Now go to the control panel and search for "activate" - click "Activate Windows" and you're back in business
You must also activate all the other MS products (like Office and Visio) - just open Excel and it will active Office

Success at last

I now have my old Windows disk running on my new hardware. There were a few annoyances. My desktop icons were scattered in a random order. My Aero Peek was broken and I had to rerun my Control Panel Performance Assessment to bring it back. There's probably more but it's 99% of what I had before...it just took me about 16 hours to get it that way.

Good luck on your quest.